操作系统: CentOS6.3
vncserver: yum安装源
一.环境部署:
1.关闭iptables和SELINUX
# service iptables stop
# setenforce 0
# vi /etc/sysconfig/selinux
---------------
SELINUX=disabled
---------------
2.安装vncserver:
# yum install "*vnc*" pixman pixman-devel libXfont -y
二.单用户root配置方法:
1.安装完毕后,启动 VNC Server,这时会要求你输入两次进行连接的初始密码。
# vncserver
------------------------
You will require a password to access your desktops.
Password: //输入密码
Verify: //再次输入密码
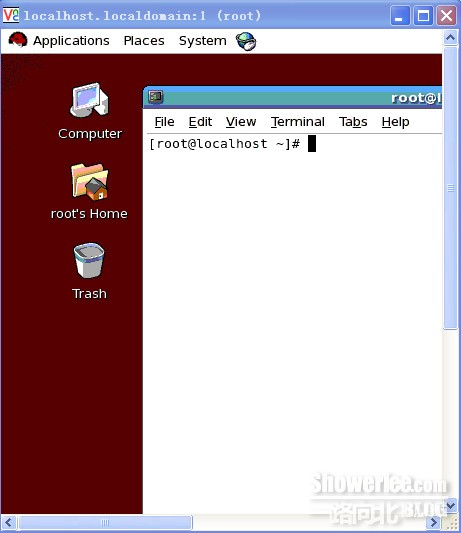
xauth: creating new authority file /root/.XauthorityNew ‘localhost.localdomain:1 (root)’ desktop is localhost.localdomain:1Creating default startup script /root/.vnc/xstartupStarting applications specified in /root/.vnc/xstartup
Log file is /root/.vnc/localhost.localdomain:1.log
--------------------------------
注:每个用户都可以启动多个 VNC Server 远程桌面,它们用 ip 加端口号:ip:1、ip:2、ip:3 来标识区分,使用同一端口会使另外登录的用户自动退出。另,VNC Server 的大部分配置文件及日志文件都在用户 home 目录的.vnc 目录下。
用户可以自定义启动号码如:
# vncserver :1
注:前面一定要有空格
-----------------------
A VNC server is already running as :1
-----------------------
2.Red Hat Linux 支持两种图形模式:KDE 模式和 gnome 模式。
你的 Redh Hat 使用的什么图形模式这个一般只有登录到图形界面查看一下才能知道,或者通过以下的命令来判断。
# ps -aux | grep gnome
如果是 gnome 桌面,那么需要修改/root/.vnc/xstartup的配置文件。
使用 vi 打开 xstartup 文件,如下:
# cd /root/.vnc
# vi xstartup
删除全部内容,然后添加如下内容:
注: 这里第一行添加的字体变量需与系统i18n文件内的变量一致,否则会出现乱码
-------------------------
LANG="zh_CN.UTF-8"
unset SESSION_MANAGER
exec /etc/X11/xinit/xinitrc
[ -x /etc/vnc/xstartup ] && exec /etc/vnc/xstartup
[ -r $HOME/.Xresources ] && xrdb $HOME/.Xresources
xsetroot -solid grey
vncconfig -iconic &
xterm -geometry 80x24+10+10 -ls -title "$VNCDESKTOP Desktop" &
#twm &
gnome-session &
-------------------------
注:若启动黑屏则添加如下脚本内容
-------------------------------
#[-x /etc/vnc/xstartup]]&& exec /etc/vnc/xstartup
[ -r $HOME/.Xresources ] && xrdb $HOME/.Xresources
xsetroot -solid grey
vncconfig -iconic &
xterm -gemetry 80x24+10+10 -ls -title "$VNCDESKTOP Desktop" &
#twm &
gnome-session &
-------------------------------
3.添加root系统环境配置
# vi /etc/sysconfig/vncservers
--------------------------------
VNCSERVERS="1:root"
VNCSERVERARGS[2]="-geometry 1280x1024 -nolisten tcp "
--------------------------------
4.重新启动 VNC Server
# vncserver -kill :1
--------------------
Killing Xvnc process ID 21198
--------------------
# vncserver
--------------------------
New ‘localhost.localdomain:1 (root)’ desktop is localhost.localdomain:1Starting applications specified in /root/.vnc/xstartupLog file is /root/.vnc/localhost.localdomain:1.log
----------------------------------------
或直接利用系统服务重启:
# /etc/init.d/vncserver restart
注: 在防火墙上打开 VNC Server 的监听端口
VNC Server 用到了三个端口:5801、5901、6001
5901为VNC客户端连接的端口号,其中的1代表开放的第一个系统用户root,和上面启动提示的
1 (root)一致,如果添加其他系统用户则为2(testuser),testuser的vnc连接端口为5902,以此类推.
5.将vncserver设为自启动:
# chkconfig --level 345 vncserver on
6.若打开防火墙,则需添加如下防火墙策略:
# iptables -A INPUT -p tcp --dport 5801 -j ACCEPT
# iptables -A INPUT -p tcp --dport 5901 -j ACCEPT
# iptables -A INPUT -p tcp --dport 6001 -j ACCEPT
保存并重启
# service iptables save
# /etc/rc.d/init.d/iptables restart
--------------------------------------
Flushing firewall rules: [ OK ]
Setting chains to policy ACCEPT: filter [ OK ]
Unloading iptables modules: [ OK ]
Applying iptables firewall rules: [ OK ]
Loading additional iptables modules: ip_conntrack_netbios_ns ip_conntrack_ftp [ OK ]
---------------------------------------------
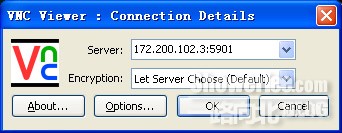
在 Windows 机器上使用 VNC Viewer 连接 VNC Server
下载 VNC Viewer,运行然后输入IP:5901,输入刚才设定的密码,进入 RHEL 桌面。

7.vncserver用户密码修改:
# vncpasswd
------------------------
Password:
Verify:
------------------------
三.多用户配置方法:
1、修改配置文件,设置可通过VNC客户端登陆的用户:
#vi /etc/sysconfig/vncservers
修改vnc配置文件为:
---------------------------
# The VNCSERVERS variable is a list of display:user pairs.
#
# Uncomment the lines below to start a VNC server on display :2
# as my 'myusername' (adjust this to your own). You will also
# need to set a VNC password; run 'man vncpasswd' to see how
# to do that.
#
# DO NOT RUN THIS SERVICE if your local area network is
# untrusted! For a secure way of using VNC, see
# <URL:http://www.uk.research.att.com/archive/vnc/sshvnc.html>.
# Use "-nolisten tcp" to prevent X connections to your VNC server via TCP.
# Use "-nohttpd" to prevent web-based VNC clients connecting.
# Use "-localhost" to prevent remote VNC clients connecting except when
# doing so through a secure tunnel. See the "-via" option in the
# `man vncviewer' manual page.
# VNCSERVERS="2:myusername"
VNCSERVERS="1:root 2:test1 3:test2"
VNCSERVERARGS[1]="-geometry 800x600"
VNCSERVERARGS[2]="-geometry 800x600"
VNCSERVERARGS[3]="-geometry 800x600"
----------------------------
# VNCSERVERARGS[2]="-geometry 800x600 -nolisten tcp -nohttpd -localhost"说明:VNCSERVERS为可通过VNC客户端远程登陆的用户
格式为:1:用户1 2:用户2 3:用户3
但这样做了,仅仅用户1才能登陆,用户2、用户3是无法登陆的。
2、修改每个用户宿主目录下的vnc配置文件,允许多用户登陆
# su - root
$ mkdir .vnc //*创建.vnc目录,用于保存此用户的vnc配置文件*//
$ vncpasswd //*设置root用户的vnc远程连接密码*//
#vi xstartup
删除全部内容,然后添加如下内容:
---------------
unset SESSION_MANAGER
exec /etc/X11/xinit/xinitrc
---------------
# su - test1
$ mkdir .vnc //*创建.vnc目录,用于保存此用户的vnc配置文件*//
$ vncpasswd //*设置test1用户的vnc远程连接密码*//
# vi xstartup
-------------
unset SESSION_MANAGER
exec /etc/X11/xinit/xinitrc
-------------
同理test2
3.更新X11字体包(支持centos默认更新源更新)
yum install pixman pixman-devel libXfont
4.重启VNC服务
# service vncserver restart
6.修改权限
# su - root
# chmod 755 .vnc/xstartup
# su - test1
# chmod 755 .vnc/xstartup
# su - test2
# chmod 755 .vnc/xstartup
5. 关闭防火墙对VNC端口的限制
如果需要从外网控制内网的某台Linux,则需要打开防火墙相应的端口,并在路由器上进行端口映射。
VNC给浏览器的端口是5800+N,给vncviewer的端口是5900+N,N是设置的display号。
如果不想打开防火墙,但是仍需要VNC这项服务,则需要:
编辑vi /etc/sysconfig/iptables
在里边加入如下两行:
-A RH-Firewall-1-INPUT -m state --state NEW -m tcp -p tcp --dport 5901 -j ACCEPT
-A RH-Firewall-1-INPUT -m state --state NEW -m tcp -p tcp --dport 5902 -j ACCEPT
这里需要的是,display N 对应的端口就是 5900+N,所以不建议设的太多。
6. 停止vncserver:
停止 vncserver 的方法是执行:vncserver -kill :1
注意:“:1”,表示停止第一个vnc桌面,1代表当前启用的VNCserver序号,“:1”之前是有一个空格的。如果目前启动的序号是2,若要关闭其,则应该使用“vncserver -kill :2”.
7. 修改vnc密码:(选读)
修改vnc密码的方法是执行:vncpasswd
输入两次密码即可。
8:检查服务器端VNC Server是否正常运行中:
执行:ps -ef|grep vnc
如果vnc在执行,可以看到类似的消息:
# ps -ef|grep vnc
root 3605 1 0 Jul13 ? 00:13:51 Xvnc :1 -desktop MyIMS.local:1 (root) -httpd /usr/share/vnc/classes -auth /root/.Xauthority -geometry 800x600 -depth 16 -rfbwait 30000 -rfbauth /root/.vnc/passwd -rfbport 5901 -pn
说明是序号为":1"vnc进程在端口为5901上进行监听。
9.VNC 客户端服务器端运行正常后,我们方可以考虑使用VNC客户端与其相连。
Windows 客户端 VNC Viewer 的配置:
a. 从 http://www.realvnc.com/download.html 下载 VNC Free Edition for Windows Version 4.1.2
b. 打开 VNCViewer :
填入VNCServer 的IP:编号(1或2或…)
c. VNCViewer 切换全屏模式:F8
10 一些配置文件:
/etc/X11/xorg.conf 设置屏幕分辨率
到这里,您的VNC应该已经能够连上,但有可能出现黑屏的问题:
a、查看/root/.vnc/下的log日志,有没有报错;有可能是xstartup权限不够。“chmod xstartup 777”更改下权限,重启后再进。
b、重新启动下电脑,试一试。我就是各种配置之后,始终黑屏,重启电脑后OK。
11.查看VNC登陆日志:
访问在你登陆用户所在家目录的 .vnc/主机名:1.log 文件
例如:
/root/.vnc/www.test.com:1.log
正文部分到此结束


还没有评论,快来抢沙发!