
Centos6.3下rsync+sersync安装配置笔记
最近单位活比较多,所以就很少更新,晚上上网碰巧看到一篇关于sersync的介绍,个人感觉较rsync+inotify配置更加规范,刚好最近手痒,就总结了下,分享给大家。
目前业内比较靠谱的同步解决方案有:
rsync+inotify-tools,Openduckbill+inotify-tools和rsync+sersync
前两者由于是基于脚本语言编写,所以规范程度,执行效率相对rsync+sersync就稍微弱一些。
sersync是使用c++编写,基于boost1.43.0,inotify api,rsync command开发,主要用于服务器同步,web镜像等功能。其对linux系统文件系统产生的临时文件和重复的文件操作能够进行过滤,所以在结合rsync同步的时候,节省了运行时耗和网络资源。因此更快,更适合线上使用。
本篇博文就是为了实现将sersync推送端/data下的数据实时同步到rsync接收端/data目录下,实现rsync服务器为sersync的镜像服务器
注:使用rsync+crontab做定时同步时,主服务器端开启rsync守护进程,而镜像服务器是运行rsync客户端,平时一般会利用crontab定时获取rsync服务器上的数据。
但使用rsync+sersync做实时同步时,用于推送文件的服务器运行sersync服务,用于接收文件的服务器则运行rsync守护进程,简单来说就是sersync会利用rsync命令将文件推送到rsync服务器,实际线上使用一般会把sersync作为主服务器,rsync作为镜像服务器,实现数据同步备份,web镜像等功能
解决方案:
操作系统: centos6.3 x86
rsync: centos自带yum源
sersync: sersync2.5_32bit
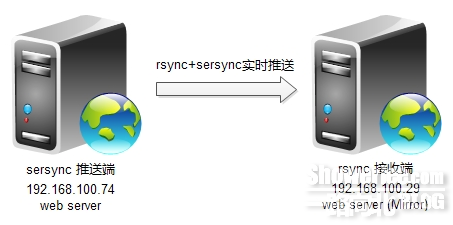
sersync 推送端 192.168.100.74
rsync 接收端 192.168.100.29
环境搭建:(接收端,推送端)
一.首先关闭selinux与iptables
# vi /etc/sysconfig/selinux
---------
SELINUX=disabled
---------
# setenforce 0
# service iptables stop
在使用sersync之前,我们必须安装配置好rsync服务器
rsync (接收端)
一.安装rsync(centos6.3默认已安装)
# yum install rsync -y
# yum install xinetd -y
二.启动rsync依赖服务
# /etc/init.d/xinetd start
# chkconfig xinetd on
三.配置:
# vi /etc/rsyncd.conf
--------------------
uid = root
gid = root
use chroot = no
max connections = 10
strict modes = yes
port = 873
address = 192.168.100.29
[data] # rsync模块名,后面配置sersync会用到
path = /data # 该同步目录只要uid所指定的用户有写权限即可
comment = mirror for test
ignore errors
read only = no
list = no
auth users = user
secrets file = /etc/rsync.pas # 密码认证文件,必须为600权限,否则rsync传输会报错
hosts allow = *
# hosts deny = 0.0.0.0/0
pid file = /var/run/rsyncd.pid
lock file = /var/run/rsync.lock
log file = /var/log/rsyncd.log
--------------------
四.创建同步目录
# mkdir /data
五.配置认证文件
# echo "user:123456" > /etc/rsync.pas
# chmod 600 /etc/rsync.pas
# rsync --daemon --config=/etc/rsyncd.conf
六.重启xinetd使其配置生效:
# /etc/init.d/xinetd restart
七.设置开机启动:
# echo "rsync --daemon --config=/etc/rsyncd.conf" >> /etc/rc.local
sersync (推送端)
一.下载sersync源码包
# wget http://sersync.googlecode.com/files/sersync2.5_32bit_binary_stable_final.tar.gz
注:若在64位平台安装则可下载64位sersync源码包,本例用32位
# wget http://sersync.googlecode.com/files/sersync2.5_64bit_binary_stable_final.tar.gz
二.创建sersync目录结构
# mkdir /usr/local/sersync
# mkdir /usr/local/sersync/conf
# mkdir /usr/local/sersync/bin
# mkdir /usr/local/sersync/log
# tar zxvf sersync2.5_32bit_binary_stable_final.tar.gz
# cd GNU-Linux-x86/
# cp confxml.xml /usr/local/sersync/conf
# cp sersync2 /usr/local/sersync/bin
三.配置sersync
1.首先创建连接rsyncd的密码文件
# echo "123456" >/etc/rsync.pas
# chmod 600 /etc/rsync.pas
2.配置confxml.xml
# cd /usr/local/sersync/conf
# vi confxml.xml
按照注释进行修改
-----------------------------
<?xml version="1.0" encoding="ISO-8859-1"?>
<head version="2.5">
# 设置本地IP和端口
<host hostip="localhost" port="8008"></host>
# 开启DUBUG模式
<debug start="false"/>
# 开启xfs文件系统
<fileSystem xfs="false"/>
# 同步时忽略推送的文件(正则表达式),默认关闭
<filter start="false">
<exclude expression="(.*)\.svn"></exclude>
<exclude expression="(.*)\.gz"></exclude>
<exclude expression="^info/*"></exclude>
<exclude expression="^static/*"></exclude>
</filter>
<inotify>
# 设置要监控的事件
<delete start="true"/>
<createFolder start="true"/>
<createFile start="true"/>
<closeWrite start="true"/>
<moveFrom start="true"/>
<moveTo start="true"/>
<attrib start="true"/>
<modify start="true"/>
</inotify>
<sersync>
# 本地同步的目录路径
<localpath watch="/data">
# 远程IP和rsync模块名
<remote ip="192.168.100.29" name="data"/>
<!--<remote ip="192.168.8.39" name="tongbu"/>-->
<!--<remote ip="192.168.8.40" name="tongbu"/>-->
</localpath>
<rsync>
# rsync指令参数
<commonParams params="-auvzP"/>
# rsync同步认证
<auth start="true" users="user" passwordfile="/etc/rsync.pas"/>
# 设置rsync远程服务端口,远程非默认端口则需打开自定义(若开启rsync+ssh, 则这里需定义SSH端口)
<userDefinedPort start="false" port="874"/><!-- port=874 -->
# 设置超时时间
<timeout start="true" time="100"/><!-- timeout=100 -->
# 设置rsync+ssh加密传输模式,默认关闭,开启需设置SSH加密证书
<ssh start="false"/>
</rsync>
# sersync传输失败日志脚本路径,每隔60会重新执行该脚本,执行完毕会自动清空。
<failLog path="/usr/local/sersync/log/rsync_fail_log.sh" timeToExecute="60"/><!--default every 60mins execute once-->
# 设置rsync+crontab定时传输,默认关闭
<crontab start="false" schedule="600"><!--600mins-->
<crontabfilter start="false">
<exclude expression="*.php"></exclude>
<exclude expression="info/*"></exclude>
</crontabfilter>
</crontab>
# 设置sersync传输后调用name指定的插件脚本,默认关闭
<plugin start="false" name="command"/>
</sersync>
# 插件脚本范例
<plugin name="command">
<param prefix="/bin/sh" suffix="" ignoreError="true"/> <!--prefix /opt/tongbu/mmm.sh suffix-->
<filter start="false">
<include expression="(.*)\.php"/>
<include expression="(.*)\.sh"/>
</filter>
</plugin>
# 插件脚本范例
<plugin name="socket">
<localpath watch="/opt/tongbu">
<deshost ip="192.168.138.20" port="8009"/>
</localpath>
</plugin>
<plugin name="refreshCDN">
<localpath watch="/data0/htdocs/cms.xoyo.com/site/">
<cdninfo domainname="ccms.chinacache.com" port="80" username="xxxx" passwd="xxxx"/>
<sendurl base="http://pic.xoyo.com/cms"/>
<regexurl regex="false" match="cms.xoyo.com/site([/a-zA-Z0-9]*).xoyo.com/images"/>
</localpath>
</plugin>
</head>
-----------------------------
3.创建推送端sersync同步目录
# mkdir /data
4.设置环境变量:
# echo "export PATH=$PATH:/usr/local/sersync/bin/" >> /etc/profile
# source /etc/profile
5.启动sersync
# sersync2 -r -d -o /usr/local/sersync/conf/confxml.xml
注:重启操作如下:
# killall sersync2 && sersync2 -r -d -o /usr/local/sersync/conf/confxml.xml
6.设置开机启动
# echo "sersync2 -r -d -o /usr/local/sersync/conf/confxml.xml" >> /etc/rc.local
验证:
(推送端)
# cd /data
# touch 1 2 3 4 5
# echo "test sersync" > 1
(接收端)
# cd /data
# ls
--------------------
1 2 3 4 5
--------------------
# cat 1
--------------------
test sersync
--------------------
注:这里提一个细节,如果接收端服务器本地创建或修改/data同步目录下的文件,当服务端进行目录同步时则不会对接收端服务器本地创建或修改的文件产生影响。
-------------大功告成----------------
本文链接:http://www.showerlee.com/archives/59
6条大神的评论


问一下 根据你写的这个步骤来了一遍 没有同步成功 怎么测试装成功了呢,还有就是 之前配置的时候防火墙关闭 配置好是否要打开
@sam
1.测试是否成功可以看rsync日志,详见rsync配置
2.除非线上部署,防火墙测试环境为了实现功能,建议关闭
@showerlee 防火墙关闭了。日志显示rsync: failed to connect to 【ip】 : Connection timed out (110) rsync error: error in socket IO (code 10) at clientserver.c(124)
@sam 查看服务是否启动,默认端口是873
如果无法启动再查看日志,看是否为账号或文件权限问题
查看端口:lsof -i:873
启动服务:rsync –daemon –config=/etc/rsyncd.conf
还是不行,大侠 方便的话 可以qq聊一下吗 我的qq2271908226
过滤同步目录下的其他目录呢,我开启了filter start=”true” 然后添加了
这个“123”目录是在同步目录下的