利用AWStatus监控nginx实时日志并认证登陆
最近一直在玩nginx,发现他配合FCGI相对apache确实是一个比较适合建站的web代理,在我的512M内存的VPS上初始配置下跑LAMP开启服务的瞬间内存直接被占满,但LNMP则占用100多M,而且访问速度还较apache的快上一些,APACHE真心该好好优化优化了。
这里顺便把awstats的配置从apache移植到nginx,供大家参考。。
系统环境:centOS6.3
NGINX: nginx-1.41
AWSTATS: awstats-7.1.1
一.下载解压awstats到系统目录
# wget http://sourceforge.net/projects/awstats/files/AWStats/7.1.1/awstats-7.1.1.tar.gz/download
# tar -zxvf awstats-7.1.1.tar.gz -C /usr/local/
# cd /usr/local/
# mv awstats-7.1.1 awstats
# cd awstats/tools/
二.生成配置文件:
# perl awstats_configure.pl
------------------------------
----- AWStats awstats_configure 1.0 (build 1.9) (c) Laurent Destailleur -----
This tool will help you to configure AWStats to analyze statistics for
one web server. You can try to use it to let it do all that is possible
in AWStats setup, however following the step by step manual setup
documentation (docs/index.html) is often a better idea. Above all if:
- You are not an administrator user,
- You want to analyze downloaded log files without web server,
- You want to analyze mail or ftp log files instead of web log files,
- You need to analyze load balanced servers log files,
- You want to 'understand' all possible ways to use AWStats...
Read the AWStats documentation (docs/index.html).
-----> Running OS detected: Linux, BSD or Unix
-----> Check for web server install
Enter full config file path of your Web server.
Example: /etc/httpd/httpd.conf
Example: /usr/local/apache2/conf/httpd.conf
Example: c:\Program files\apache group\apache\conf\httpd.conf
Config file path ('none' to skip web server setup):
> none
Your web server config file(s) could not be found.
You will need to setup your web server manually to declare AWStats
script as a CGI, if you want to build reports dynamically.
See AWStats setup documentation (file docs/index.html)
-----> Update model config file '/usr/local/awstats/wwwroot/cgi-bin/awstats.model.conf'
File awstats.model.conf updated.
-----> Need to create a new config file ?
Do you want me to build a new AWStats config/profile
file (required if first install) [y/N] ? y
-----> Define config file name to create
What is the name of your web site or profile analysis ?
Example: http://www.mysite.com
Example: demo
Your web site, virtual server or profile name:
-----> Define config file path
In which directory do you plan to store your config file(s) ?
Default: /etc/awstats
Directory path to store config file(s) (Enter for default): 回车
>
-----> Create config file '/etc/awstats/awstats.www.showerlee.com.conf'
Config file /etc/awstats/awstats.www.showerlee.com.conf created.
-----> Add update process inside a scheduler
Sorry, configure.pl does not support automatic add to cron yet.
You can do it manually by adding the following command to your cron:
/usr/local/awstats/wwwroot/cgi-bin/awstats.pl -update -config=www.showerlee.com
Or if you have several config files and prefer having only one command:
/usr/local/awstats/tools/awstats_updateall.pl now
Press ENTER to continue... 回车
A SIMPLE config file has been created: /etc/awstats/awstats.www.showerlee.com.conf
You should have a look inside to check and change manually main parameters.
You can then manually update your statistics for 'www.showerlee.com' with command:
> perl awstats.pl -update -config=www.showerlee.com
You can also build static report pages for 'www.showerlee.com' with command:
> perl awstats.pl -output=pagetype -config=www.showerlee.com
Press ENTER to finish... 回车
----------------------
一路默认回车即可完成awstats配置文件向导,该配置文件保存在/etc/awstats/下
三.配置awstats
# vi /etc/awstats/awstats.www.abc.com.cn.conf
修改如下几处配置
-------------
LogFile="/usr/local/nginx/logs/access_log"
#nginx若建立分段日志见修改如下
LogFile="/usr/local/nginx/logs/www.abc.com.cn-%YYYY%MM%DD.access_log"
LogType=W
LogFormat=1
#此处log目录必须具有写入权限
DirData="/usr/local/nging/html/www.abc.com.cn/awstats/log"
AllowToUpdateStatsFromBrowser=1
#显示简体中文页面
Lang="cn"
#设置awstats URL:
DirCgi="/awstats"
DirIcons="/awstatsicons"
------------
四.nginx配置:
1.nginx虚拟主机日志配置:
# vi /usr/local/nginx/conf/nginx.conf
将http层级的如下行注释去掉
---------------------------
log_format main '$remote_addr - $remote_user [$time_local] "$request" '
'$status $body_bytes_sent "$http_referer" '
'"$http_user_agent" "$http_x_forwarded_for"';
access_log logs/access.log main;
---------------------------
在需要监控的www.abc.com.cn虚拟主机的server层级添加
--------------------------
access_log /usr/local/nginx/logs/www.abc.com.cn.access_log;
--------------------------
2.利用脚本分段切割nginx日志格式为awstats可识别格式
注:apache在这里是利用自带rotatelogs命令实现日志每日分页切割
# vi /etc/rc.d/nginx_cut.sh
---------------------------
#!/bin/bash
# nginx日志位置
logs_path="/usr/local/nginx/logs/"
# nginx虚拟目录日志名
domain_name=www.abc.com.cn
log_name="${logs_path}${domain_name}.access_log"
# 判断nginx日志是否生成,如果生成则将日志内容增量到awstats可识别格式日志,并将nginx日志内# 容清空,否则重启nginx服务,重新生成日志文件
if [ -e "$log_name" ];
then
cat $log_name >> $logs_path$domain_name-$(date +"%Y%m%d").access_log
cat /dev/null > $log_name
else
/etc/init.d/nginx restart
fi
---------------------------
注:这里的date +"%Y%m%d"需与/etc/awstats/awstats.www.abc.com.cn.conf下
LogFile="/usr/local/nginx/logs/www.abc.com.cn-%YYYY%MM%DD.access_log"格式对应,否则无法写入日志数据
3.awstats源代码配置:
1).创建www.abc.com.cn虚拟目录下awstats二级链接
# mkdir -p /usr/local/nginx/html/www.abc.com.cn/awstats
2).设置log目录可写权限,用于存放转化后的日志数据
# cd /usr/local/nginx/html/www.abc.com.cn/awstats
# mkdir log/ && chmod -R 777 log
3).复制awstats页面需要的源代码(icon、css等)
# cd /usr/local/awstats/wwwroot/
# cp -R icon /usr/local/nginx/html/www.abc.com.cn/awstats
# cp -R css /usr/local/nginx/html/www.abc.com.cn/awstats
# cp -R classes /usr/local/nginx/html/www.abc.com.cn/awstats
# cp -R js /usr/local/nginx/html/www.abc.com.cn/awstats
# cd /usr/local/nginx/html/www.abc.com.cn/awstats/
# chmod -R 755 icon css classes js
4.编写awstats静态页面脚本:
# vi /etc/rc.d/awstats.sh
版本一(只能生成一级链接日志分析)
-------------
#/bin/bash
PERL=/usr/bin/perl
awstats=/usr/local/awstats/wwwroot/cgi-bin/awstats.pl
$PERL $awstats -update -config=www.abc.com.cn
$PERL $awstats -config=www.abc.com.cn -output -staticlinks > /usr/local/nginx/html/www.abc.com.cn/awstats/index.html
-------------
版本二(生成多级链接日志分析,推荐)
---------------
#/bin/bash
########################################
PERL=/usr/bin/perl
awstats=/usr/local/awstats/wwwroot/cgi-bin/awstats.pl
hostdir=/usr/local/nginx/html/www.abc.com.cn/awstats
buildstaticpages=/usr/local/awstats/tools/awstats_buildstaticpages.pl
########################################
$buildstaticpages -update -config=www.abc.com.cn -lang=cn -dir=$hostdir -awstatsprog=$awstats
---------------
添加一个主页的软链:
# cd /usr/local/nginx/html/www.abc.com.cn/awstats/
# ln -s awstats.www.abc.com.cn.html index.html
5.加入计划任务:
实现每分钟切割日志并生成静态awstats页面
# crontab -e
-------------
* * * * * /bin/sh /etc/rc.d/nginx_cut.sh
* * * * * /bin/sh /etc/rc.d/awstats.sh
-------------
重启计划任务
# service crond restart
6.添加nginx alias功能,防止awstats页面暴图:
# vi /usr/local/nginx/conf/nginx.conf
在www.abc.com.cn虚拟主机的server层级添加
-----------------
autoindex on;
location /awstatscss {
alias /usr/local/nginx/html/www.abc.com.cn/awstats/css/;
}
location /awstatsicons {
alias /usr/local/nginx/html/www.abc.com.cn/awstats/icon/;
}
location /awstatsclasses {
alias /usr/local/nginx/html/www.abc.com.cn/awstats/classes/;
}
-----------------
重启nginx
# service nginx restart
7.添加nginx目录访问认证功能
1).下载htpasswd.sh脚本文件并执行
# wget -c http://soft.vpser.net/lnmp/ext/htpasswd.sh
# sh htpasswd.sh
按提示输入用户名、密码、及认证文件名。脚本会自动生成认证文件
---------------------------------
=====================================
# A tool like htpasswd for Nginx #
#-----------------------------------#
# Author:Licess http://www.lnmp.org #
=====================================
Please input UserName:awstats
===========================
UserName was: awstats
===========================
Please input the Password:123456
===========================
Password was: 123456
===========================
Please input Auth filename:awstat_auth
===========================
Auth File: /usr/local/nginx/conf/awstat_auth
===========================
Press any key to Creat...or Press Ctrl+c to cancel 回车
Create Auth file......
Create Auth file successful,auth file path:/usr/local/nginx/conf/awstat_auth.conf.
-------------------------------------
2).为Nginx添加认证配置:
# vi /usr/local/nginx/conf/nginx.conf
在www.abc.com.cn虚拟主机的server层级添加:
-------------------------
location ^~ /awstats/ {
auth_basic "Authorized users only";
auth_basic_user_file /usr/local/nginx/conf/awstat_auth.conf;
}
-------------------------
注:
"Authorized users only"为登陆界面提示信息
"/usr/local/nginx/conf/awstat_auth.conf" 为htpasswd.sh脚本返回的认证文件的路径,内含明文的登陆名和加密的密码
nginx.conf下www.abc.com.cn虚拟目录server层级的完整配置如下:
------------------------------
server {
listen 80;
server_name "www.abc.com.cn";
index index.html index.htm index.php;
root /usr/local/nginx/html/www.abc.com.cn;
# fcgi+php支持
location ~ \.php$ {
root html;
fastcgi_pass 127.0.0.1:9000;
fastcgi_index index.php;
fastcgi_param SCRIPT_FILENAME /usr/local/nginx/html/www.abc.com.cn$fastcgi_script_name;
include fastcgi_params;
}
# PHP伪静态
if (!-e $request_filename) {
rewrite ^/[_0-9a-zA-Z-]+(/wp-.*) $1 last;
rewrite ^/[_0-9a-zA-Z-]+.*(/wp-admin/.*\.php)$ $1 last;
rewrite ^/[_0-9a-zA-Z-]+(/.*\.php)$ $1 last;
}
# 虚拟目录访问日志
access_log /usr/local/nginx/logs/www.abc.com.cn.access_log;
# awstats防暴图
autoindex on;
location /awstatscss {
alias /usr/local/nginx/html/www.abc.com.cn/awstats/css/;
}
location /awstatsicons {
alias /usr/local/nginx/html/www.abc.com.cn/awstats/icon/;
}
location /awstatsclasses {
alias /usr/local/nginx/html/www.abc.com.cn/awstats/classes/;
}
# awstats页面认证
location ^~ /awstats/ {
auth_basic "Authorized users only";
auth_basic_user_file /usr/local/nginx/conf/awstat_auth.conf;
}
}
------------------------------
3).重启nginx
# service nginx restart
五.Web查看nginx+awstats流量监控日志.
1.浏览器地址栏输入 http://www.abc.com.cn/awstats
注:实验环境访问页面需修改客户端Hosts文件
提示输入用户名和密码
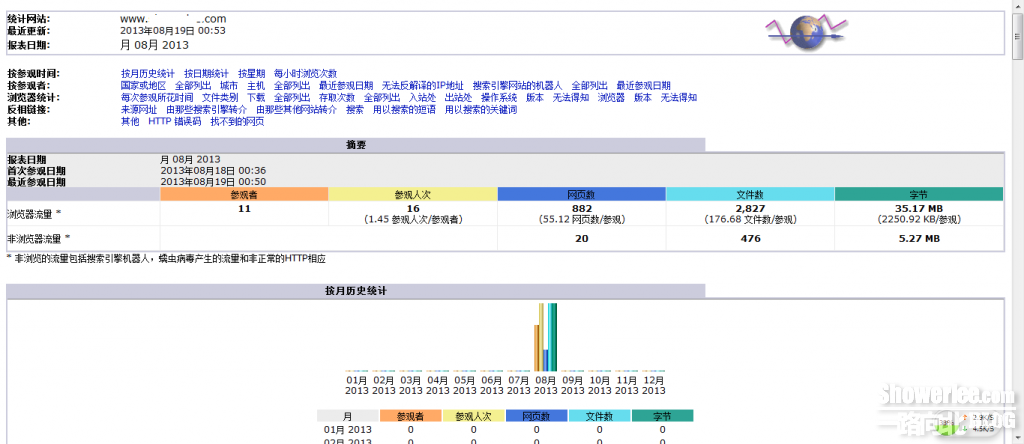
日志分析主页如图:
大功告成。。。。。
本文链接:http://www.showerlee.com/archives/120


还没有评论,快来抢沙发!