
CentOS6.3下安装fail2ban防暴力破解工具
fail2ban可以监视你的系统日志,然后匹配日志的错误信息(正则式匹配)执行相应的屏蔽动作(一般情况下是调用防火墙屏蔽),如:当有人在试探你的SSH、SMTP、FTP密码,只要达到你预设的次数,fail2ban就会调用防火墙屏蔽这个IP,而且可以发送e-mail通知系统管理员,是一款很实用、很强大的软件!
功能和特性:
1、支持大量服务。如sshd,apache,qmail,proftpd,sasl等等
2、支持多种动作。如iptables,tcp-wrapper,shorewall(iptables第三方工具),mail notifications(邮件通知)等等。
3、在logpath选项中支持通配符
4、需要Gamin支持(注:Gamin是用于监视文件和目录是否更改的服务工具)
5、需要安装python,iptables,tcp-wrapper,shorewall,Gamin。如果想要发邮件,那必需安装postfix或sendmail
核心原理:
其实fail2ban就是用来监控,具体是调用iptables来实现动作!
好了,那下面来说说具体怎么安装、部署吧。
一、首先是服务安装
首先配置yum源,这里采用的是yum直接装(也可源码安装)
vim /etc/yum.repos.d/CentOS-Base.repo
在最后新增:
[atrpms]
name=Red Hat Enterprise Linux $releasever - $basearch - ATrpms
baseurl=http://dl.atrpms.net/el$releasever-$basearch/atrpms/stable
gpgkey=http://ATrpms.net/RPM-GPG-KEY.atrpms
gpgcheck=1
enabled=1
然后直接就yum装:yum -y install fail2ban
安装完成后,服务配置目录为:/etc/fail2ban
/etc/fail2ban/action.d #动作文件夹,内含默认文件。iptables以及mail等动作配置
/etc/fail2ban/fail2ban.conf #定义了fai2ban日志级别、日志位置及sock文件位置
/etc/fail2ban/filter.d #条件文件夹,内含默认文件。过滤日志关键内容设置
/etc/fail2ban/jail.conf #主要配置文件,模块化。主要设置启用ban动作的服务及动作阀值
/etc/rc.d/init.d/fail2ban #启动脚本文件
二、安装后配置
首先来看看日志文件的默认定义:
cat /etc/fail2ban/fail2ban.conf |grep -v ^#
[Definition]
loglevel = 3
logtarget = SYSLOG #我们需要做的就是把这行改成/var/log/fail2ban.log,方便用来记录日志信息
socket = /var/run/fail2ban/fail2ban.sock
再来看看主配置默认生效的配置:
cat /etc/fail2ban/jail.conf |grep -v ^# |less
[DEFAULT] #全局设置
ignoreip = 127.0.0.1 #忽略的IP列表,不受设置限制(白名单)
bantime = 600 #屏蔽时间,单位:秒
findtime = 600 #这个时间段内超过规定次数会被ban掉
maxretry = 3 #最大尝试次数
backend = auto #日志修改检测机制(gamin、polling和auto这三种)
[ssh-iptables] #针对各服务的检查配置,如设置bantime、findtime、maxretry和全局冲突,服务优先级大于全局设置
enabled = true #是否激活此项(true/false)
filter = sshd #过滤规则filter的名字,对应filter.d目录下的sshd.conf
action = iptables[name=SSH, port=ssh, protocol=tcp] #动作的相关参数
sendmail-whois[name=SSH, dest=root, sender=fail2ban@example.com] #触发报警的收件人
logpath = /var/log/secure #检测的系统的登陆日志文件
maxretry = 5 #最大尝试次数
PS:logpath(Centos5和Rhel5中)要写成/var/log/secure,这个是系统登陆日志,不能随意设置
service fail2ban start #启动服务即可(就用默认的主配置文件里定义的)
service iptables start #fail2ban依赖预iptables #之前改过日志路径,不行的话就再重启fail2ban
三、测试功能
测试机:192.168.30.251
fail2ban:192.168.29.253
在测试机上ssh 192.168.29.253,并且连续输入超过5次密码不对(经测试有延迟,多试几次),就会出现下图,连接不上
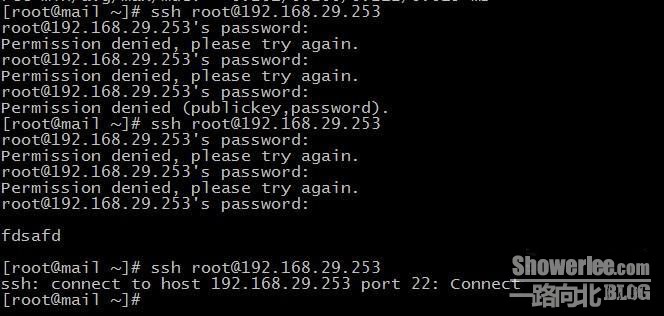
fail2ban上会产生日志记录:阻挡了此ip的续连

四、扩展说明
其实fail2ban的功能还是很丰富的,刚刚只是测试了它默认开启的防ssh暴力破解功能。
这里介绍防止vsftpd被暴力破解功能.
1.YUM安装vsftpd(yum配置略)
#yum install vsftpd -y
2.配置vsftpd,开启访问日志和传输日志支持
#vi /etc/vsftpd/conf/vsftpd.conf
添加:
xferlog_enable=YES
dual_log_enable=YES
vsftpd_log_file=/var/log/vsftpd.log
3.配置fail2ban的jail.conf文件,添加如下内容
#vi /etc/fail2ban/jail.conf
添加:
[vsftpd-iptables]
enabled = true
filter = vsftpd
action = iptables[name=VSFTPD, port=21, protocol=tcp]
sendmail-whois[name=VSFTPD, dest=you@example.com]
logpath = /var/log/secure
------------------补 充----------------------
一 安装 Fail2ban 服务
下载rpmforge , 里面有大量最新的rpm包.
wget http://dag.wieers.com/rpm/packages/rpmforge-release/rpmforge-release-0.3.6-1.el5.rf.i386.rpm
rpm -ivh rpmforge-release-0.3.6-1.el5.rf.i386.rpm
开始yum吧~~!
yum install fail2ban
fail2ban noarch 0.8.2-3.el5.rf rpmforge 125 k
Installing for dependencies:
gamin
gamin-python
安装是十分简单的拉.
fail2ban 原理
fail2ban 调用 iptables 实时阻挡外界的攻击,按照你的要求在一段时间内找出符合条件的日志,然后动作。
二 设定fail2ban服务
fail2ban 的设定档在这里
/etc/fail2ban
fail2ban.conf 日志设定文档
jail.conf 阻挡设定文档
/etc/fail2ban/filter.d 具体阻挡内容设定目录
三 为何需要安装fail2ban呢?
Extmail 本身是没有邮件系统被攻击的解决方案,黑客是会不断user unknow地试探pop3 smtp 认证得到密码或电邮地址,大家可能问得到邮地址有何作用呢?电邮地址是可以贩卖的哦
而且十分值钱的,如果垃圾邮件者购买了这些地址,你的邮件服务器就有排忙了。
你话需不需要安装个fail2ban保护呢?
四 实施保护
1. 保护 SSH 拦截
先看看fail2ban是如何拦截的?
cat /etc/fail2ban/filter.d/sshd.conf
failregex = ^%(__prefix_line)s(?:error: PAM: )?Authentication failure for .* from <HOST>\s*$
fail2ban 使用了正则表达式找出:
Authentication failure/authentication failure
ROOT LOGIN REFUSED
refused connect from
POSSIBLE BREAK-IN ATTEMPT
not allowed because not listed in AllowUsers
以上的状况,可以根据你实际要求删减. 其中<HOST> 为建立连接的IP
开启 SSH 拦截
vi /etc/fail2ban/jail.conf
[ssh-iptables]
enabled = true
filter = sshd
action = iptables[name=SSH, port=ssh, protocol=tcp]
sendmail-whois[name=SSH, dest=收件者电邮地址, sender=寄件者电邮地址]
logpath = /var/log/secure
maxretry = 3
findtime = 300
bantime = 86400
fail2ban 会按照你的要求去查看/var/log/secure日志文件,然后在findtime = 300 "5分钟" 之内符合条件
的记录下来,如果到达了maxretry = 3 "3次符合条件" 就阻挡这个IP连接22端口 bantime = 86400 "一天的时间".
2. POP3 保护拦截
cat /etc/fail2ban/filter.d/courierlogin.conf
failregex = LOGIN FAILED, .*, ip=\[<HOST>\]$
这里表示错误地输入用户名/密码的pop3连接.
开启 pop3 保护
vi /etc/fail2ban/jail.conf
[POP3]
enabled = true
filter = courierlogin
action = iptables[name=pop3, port=110, protocol=tcp]
logpath = /var/log/maillog
bantime = 1800
findtime = 300
maxretry = 15
大家应该懂得如何看了吧? 我不写拉!好累。参数可以按照你实际要求修改噢~!
3. POP3-SSL 保护拦截
cat /etc/fail2ban/filter.d/courierlogin-ssl.conf
failregex = LOGIN FAILED, .*, ip=\[<HOST>\]$
这里表示错误地输入用户名/密码的pop3-ssl连接.
vi /etc/fail2ban/jail.conf
[POP3-SSL]
enabled = true
filter = courierlogin-ssl
action = iptables[name=pop3-ssl, port=995, protocol=tcp]
logpath = /var/log/maillog
bantime = 1800
findtime = 300
maxretry = 15
4 SMTP 保护拦截
cat /etc/fail2ban/filter.d/couriersmtp.conf
failregex = postfix/smtpd.* warning: unknown\[<HOST>\]: SASL LOGIN authentication failed: authentication failure
这里表示错误地输入用户名/密码的smtp连接.
vi /etc/fail2ban/jail.conf
[SMTP]
enabled = true
filter = couriersmtp
action = iptables[name=smtp, port=25:366, protocol=tcp]
logpath = /var/log/maillog
bantime = 1800
findtime = 300
maxretry = 15
参数可以按照你实际要求修改.
5. Extmail 登录保护
由于Extmail 的web mail 登入没有做到保护,现在加固吧!
vi /etc/fail2ban/filter.d/extmail.conf
failregex = extmail.*: user=.*, client=<HOST>, module=login, status=badlogin
这里表示错误地输入用户名/密码的web mail 登入.
vi /etc/fail2ban/jail.conf
[extmail]
enabled = true
filter = extmail
action = iptables[name=httpd, port=http, protocol=tcp]
logpath = /var/log/maillog
bantime = 300
findtime = 300
maxretry = 6
6. POSTFIX 保护User unknow 的试探.
不知道这个动作的意思先看看这篇文章。
http://hi.baidu.com/enjoyunix/blog/item/e8506058fd3c3189810a183a.html
vi /etc/fail2ban/filter.d/postfix.conf
failregex = reject: RCPT from (.*)\[<HOST>\]: 450
vi /etc/fail2ban/jail.conf
[POSTFIX]
enabled = true
filter = postfix
action = iptables[name=postfix, port=25, protocol=tcp]
logpath = /var/log/maillog
bantime = 43200
findtime = 1200
maxretry = 5
这里保护了User unknow 的试探以及垃圾邮件跳信攻击。
五 看看iptables
iptables -L -nv
pkts bytes target prot opt in out source destination
0 0 fail2ban-pop3-ssl tcp -- * * 0.0.0.0/0 0.0.0.0/0 tcp dpt:995
773 83329 fail2ban-postfix tcp -- * * 0.0.0.0/0 0.0.0.0/0 tcp dpt:25
299 12660 fail2ban-pop3 tcp -- * * 0.0.0.0/0 0.0.0.0/0 tcp dpt:110
301 12740 fail2ban-ftp tcp -- * * 0.0.0.0/0 0.0.0.0/0 tcp dpt:21
3354 253K fail2ban-SSH tcp -- * * 0.0.0.0/0 0.0.0.0/0 tcp dpt:22
438 33979 fail2ban-httpd tcp -- * * 0.0.0.0/0 0.0.0.0/0 tcp dpt:80
Chain FORWARD (policy ACCEPT 0 packets, 0 bytes)
pkts bytes target prot opt in out source destination
Chain OUTPUT (policy ACCEPT 5703 packets, 829K bytes)
pkts bytes target prot opt in out source destination
Chain fail2ban-SSH (1 references)
pkts bytes target prot opt in out source destination
3354 253K RETURN all -- * * 0.0.0.0/0 0.0.0.0/0
Chain fail2ban-ftp (1 references)
pkts bytes target prot opt in out source destination
301 12740 RETURN all -- * * 0.0.0.0/0 0.0.0.0/0
Chain fail2ban-httpd (1 references)
pkts bytes target prot opt in out source destination
438 33979 RETURN all -- * * 0.0.0.0/0 0.0.0.0/0
Chain fail2ban-pop3 (1 references)
pkts bytes target prot opt in out source destination
299 12660 RETURN all -- * * 0.0.0.0/0 0.0.0.0/0
Chain fail2ban-pop3-ssl (1 references)
pkts bytes target prot opt in out source destination
Chain fail2ban-postfix (1 references)
pkts bytes target prot opt in out source destination
773 83329 RETURN all -- * * 0.0.0.0/0 0.0.0.0/0
Chain fail2ban-smtp (0 references)
pkts bytes target prot opt in out source destination
0 0 RETURN all -- * * 0.0.0.0/0 0.0.0.0/0
如何监察呢?
#watch -n 1 fail2ban-client status POSTFIX
Status for the jail: POSTFIX
|- filter
| |- File list: /var/log/maillog
| |- Currently failed: 2
| `- Total failed: 22
`- action
|- Currently banned: 0
| `- IP list:
`- Total banned: 0
看看那些垃圾邮件者真是好无聊!不断地试探我的邮件服务器呢。
六 看看fail2ban的日志
# cat fail2ban.log | grep '] Ban '
2009-04-07 20:22:44,575 fail2ban.actions: WARNING [POSTFIX] Ban ip地址
就以看到过去有那些IP拦截了,以及是那个服务。
# cat fail2ban.log | grep '] Unban '
可以查看什么时候解的。
本文链接:http://www.showerlee.com/archives/844
继续浏览:Fail2ban


还没有评论,快来抢沙发!